Wednesday, January 29, 2020

My Rusty Beater: Update #1

Remove and replace gas tank (for starters)


click here for my original post on this car

This all started with a "check engine" light.
The code was P1456. --large leak on tank side of evaporative system. Thinking it was something small, I started to investigate (yeah.. not small). A mentor of mine pointed out that he could smell gas under the car, and could see wetness on a tank seam. Yup... that could be the cause.


New tank on subframe almost ready for reinstall


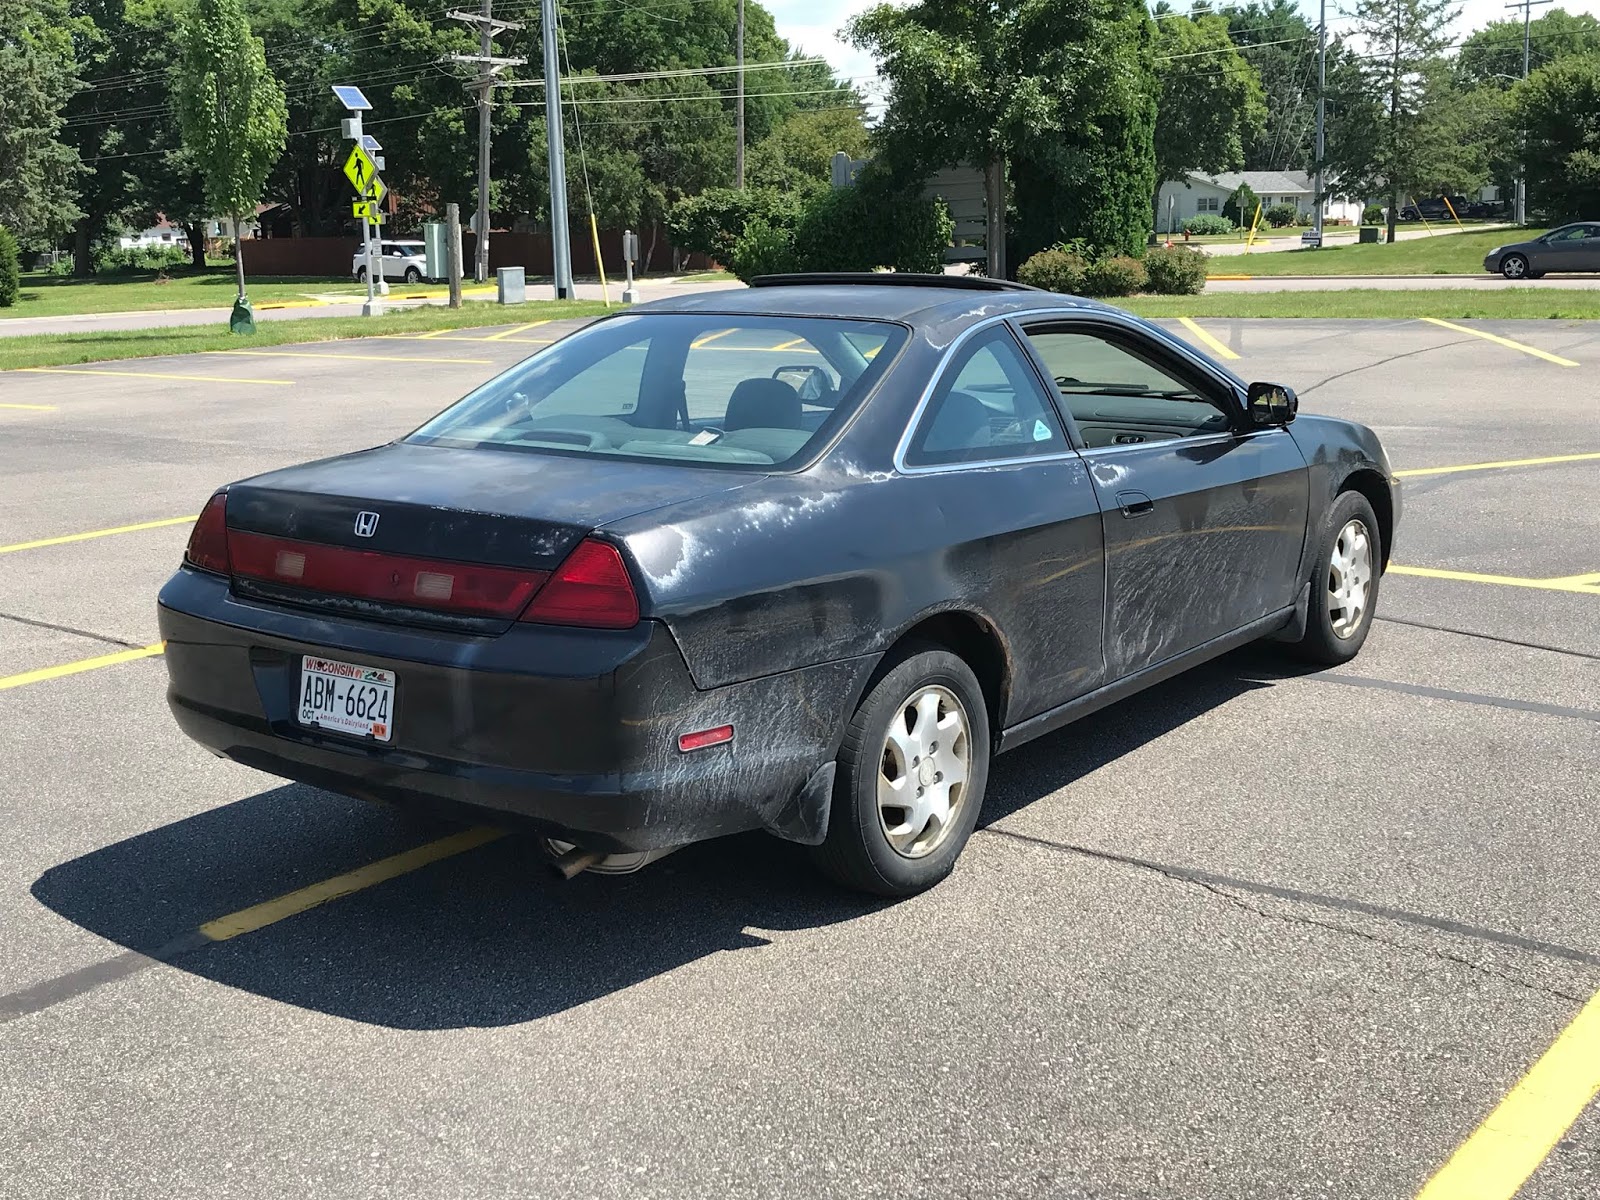
2000 Honda Accord Coupe EX beater


Step-by-step for this job + extra things I had to do, as I came across road blocks:

  • Disconnect electric connector to fuel pump
  • Drop exhaust system
  • Remove filler neck cover
  • Disconnect rubber filler and vent hoses, connected to filler neck
  • Disconnect vapor lines by charcoal canister
  • Disconnect plastic "quick connect" fittings to steel supply and return, fuel lines (not gonna happen. So....Cut nylon lines at fitting, and replace with 1 new "quick connect" fitting. Second fitting replace...fail, had to buy OE replacement return nylon section.)
  • Disconnect electrical connectors for rear wheel speed sensors
  • Remove heat shield on underside of rear subframe
  • Disconnect parking brake cables from caliper and support brackets
  • Disconnect rear brake hose from support brackets
  • Disconnect rear calipers from knuckle, hang them on spring
  • Disconnect bottom of struts from knuckle (not gonna happen, seized bolt on drivers side. So....drop subframe with strut attached. Cut though connecting bolt on both sides of bushing, with hacksaw, and muscle it out, ...took forever)
  • Remove 4 subframe bolts
  • Drop subframe using floor jack
  • Unscrew flange to remove in-tank fuel pump (not gonna happen. So....drill out ALL hardware for fuel pump and vapor recovery system)
  • Syphon out all fuel from tank..........At this point, I am free to make sparks, and use a torch, if need be.
  • Disconnect 2 metal straps holding tank to subframe (not gonna happen. So....cut through straps with hacksaw, and sawzall through 2 rusted bolts and replace)
  • Remove remains of metal straps, and replace with new ones
  • Remove and replace tank
  • Install new fuel pump and existing vapor recovery unit in new tank. (see picture #1)
  • Install subframe and reattach basically in reverse of steps above.


Decided to expand job to include the following:

  • Replace fuel filler neck
  • Replace fuel pump (since I was in there)
  • Replace rear struts and springs (after bolt fiasco)
  • Replace all steel fuel lines that run from engine to the nylon lines
  • Replace 2 steel brake lines going from proportioning valve to rear brake hoses.
  • Make all new metal supports for lines, and add new plastic clips (old ones are long gone).


Cost of parts for this job:

  • Tank $165
  • Filler neck $37
  • Fuel pump $99
  • Rear struts, loaded $81
  • new OE shock bolt $4
  • Steel pre-bent fuel lines $179
  • "Quick connect" fittings $10
  • Valex Racing braided stainless brake lines $135
  • Plastic line holder clips $33
  • OE nylon return fuel line section $64
  • Miscellaneous $50?

Total $857


Top of old tank


source of a least one leak.


New tank installed on rear subframe


A side note:
The underside of this car is so rusty, that 50% of all fasteners or bolts that need to be turned for disassembly, snap or crumble, and need to be drilled out. Odds are that the existing threads will not be saved when doing so. Thus, this car has given me the opportunity to try my hand at "tap and die" work. Not easy, as the spots can be upside-down, in hard to reach places. (no luxury of a drill press here.)

Interesting point...if you gain some experience tapping threads, you are more likely to be able to save rusted hardware, because if you can budge a rusted nut or bolt, you can possibly save it, by turning it with the same back and forth cutting motion, used when tapping threads.


I had to cut the old "quick connect" fittings apart with a hacksaw and pry them off. Because this little bit of rust underneath, rendered them impossible to separate.


This high pressure fuel line fitting on the firewall
took a boat-load of torque to crack loose after 20 years.


Fuel and brake lines

My fuel and brake lines were in raggedy condition. Since I had to almost ruin them, to separate the metal and nylon, and they looked to be on their last legs anyway, I decided to go ahead and replace them all, as this would be the time. I drilled and tapped holes for my new homemade supports, and added some modified, orange, Ebay plastic line clips.


fuel and brake lines by firewall, before...


...after


middle, before...


...after


at rear axle area, before...


...after


I had to drill out all the old hardware holding the fuel pump, so that I could restore and reuse the metal flange that holds the pump against the gasket. (that was the only part that was staying) the Honda dealer wanted $42 for that simple metal part, so I decided to rescue it.

Retrieving fuel pump flange to restore and reuse.


Bottom of filler neck looked pretty sketchy, so... since it's cheap,...remove and replace.


Old and new fuel pump.


New lines seen from below. 


New tank installed seen from below


Mission Accomplished:

This was a job that I was almost ready to bail on, when I first realized what needed to be done. I'm glad I went forward. This job was all done on jack stands, without a lift. It was mostly labor, and the replacement parts for this car are cheap, and plentiful (mostly). I learned a lot from this exercise in "remove and replace" and I feel that my competence has gone up a notch.

My guess is, If all this work was done by a professional shop, the bill would come to about $4,000-5,000 - parts and labor (not even using OE). Seems like a bargain, that I did it for $850.

The check engine light never came back. I passed emissions, and have current tags on the car. Even if this had NOT been the cause of the code, it needed to be done, or else the car junked. A gas tank leaking because of a rusty seam will be undrivable after a while, if left untreated.


Sunday, November 10, 2019

In My Garage: A Rusty Beater


Something to cut my mechanical teeth on.


In 2018 I went back to school for the 6th time. (Before that, there was my Bachelors in Fine Arts, then Masters in Fine Arts. Five years later: print and interactive design, 7 years after that: interactive design refresher, 5 years after that: something completely different - truck driving school,  class A CDL w/ hazmat. Six years later again, after I retired at 48, here we are: Automotive technician.)

I had no background in wrenching, and I wanted to learn how to work on cars, as I already owned 5, and wanted to be a better steward of my car collection. I was tired of paying shops $120 an hour to work on them, so I enrolled in the Automotive Maintenance Technician Program (1 year, full time) at my local community college, MATC Oak Creek.

I bought this beater halfway through the program, as a lab rat of sorts. Here was a car I got for cheap off Craigslist, so I could practice my skills. I could risk breaking things, and the car would not be anything too precious. All my other cars were more valuable, and I would be more stressed about making mistakes on them.


Cherry on top: Custom license plate frame


Japanese battle flag sticker.
I have this on the rear side windows of all my Japanese cars.
Love the abstract design, flash of color, and repping Japan.


2000 Honda Accord Coupe EX


Why this car?
Criteria --- look cool, dirt cheap, reliable as possible.

I had formerly bought one of these cars new, just before 9-11. That was a silver EX V6. I guess I was still attracted to the body style, because here I was, 17 years later, trolling Craigslist for $1000 cars. I negotiated the car from $1200 down to $800 and bought it off a 25-year-old kid. It ran and drove good, 225K on the clock, so I was pretty happy with this deal. As can be seen in the photos the clear coat is flaking off, which I kind of like. It has a sort of "rat rod" patina. The path for this car was NOT to fully restore it, nor turn it into a performance machine. The idea was just simply to remove and replace factory components, as needed, for as cheaply as possible, and learn skills along the way.

I spent about another $1000 in parts, so far. Some things are Honda brand original equiptment, others cheap Chinese parts (depending on how vital the component is).


The first new car I ever bought, was this silver one, 18 years ago.


Day 1: The beater when I bought it.
Mid-July, and it was still wearing last winter's salt.


The work I did:


Restored the yellowed headlights: $12 (plastic polish and headlight coating)
Replaced 3 broken sway bar end links: about $65
Replaced exhaust system from the manifold back: $300 (flex-pipe, cat, factory style cat-back)
Replaced upstream and downstream O2 sensors: $110
Replaced broken passenger side view mirror $45
Black Plasti-dipped chrome window trim $15
Replaced cabin air filters: $8
Replaced PCV valve: $8
Replaced spark plugs: $20?
Replaced burnt out gauge cluster and dash bulbs with LEDs where possible: $17
Compression test: free. (6 count, dry #1-185 psi, #2-180 psi, #3-190 psi, #4-185 psi)
Serviced AC system refrigerant: free (loose Schrader valve was cause of no AC)
Mounted and balanced 4 tires $80 (Junk yard tires)
Timing belt and water pump replacement: $120 (Gates brand)
Valve cover gasket and repaint: $15
Upgrade headlight bulbs to LED: $15

Drain and fill:
Oil and filter: (Mobil One high milage full synthetic)
Coolant (generic green)
Automatic transmission fluid (Honda OE)
Power steering fluid (Honda OE)
Brake fluid (generic DOT 3)

I paid a shop $150 to tint the windows to complete the look.
Seat belt buckle was replaced at dealer (bad switch) : free, lifetime warranty

Currently about to replace gas tank, as it has a hole rusted in it. Probably fuel lines as well. (See end of post)


Headlight restoration: before on right, after on left.


Up on Jack stands about to replace sway bar end links and exhaust


Old exhaust taken off in one piece.
Holes rusted through here and there.


New exhaust: total cost about $300.
All cheap Ebay stuff, works fine.


Tires that came with the car were bald, and scary in the rain.


Replaced them with 4 mismatched junkyard tires: $20 each.
Good condition, all 2-3 years old, 60-70% tread left.


Solar brand? Never heard of it. I'll take it.


New cabin air filters next to the old ones.
I wondered if they were the original to the car.


EX trim leather interior is in decent shape.
There are 2 small rips on the drivers seat that don't really bother me.


Timing Belt & water pump job.


I followed the manufacturer's step by step for this job, via access to ShopKey Pro.
Nice that it has the factory torque spec for every fastener.


Example: ShopKey screen shot for the one motor mount that needed to come off.


my notebook checklist for this job.


I also studied this YouTube video of the exact same job.


The timing and balancer belts finally exposed 


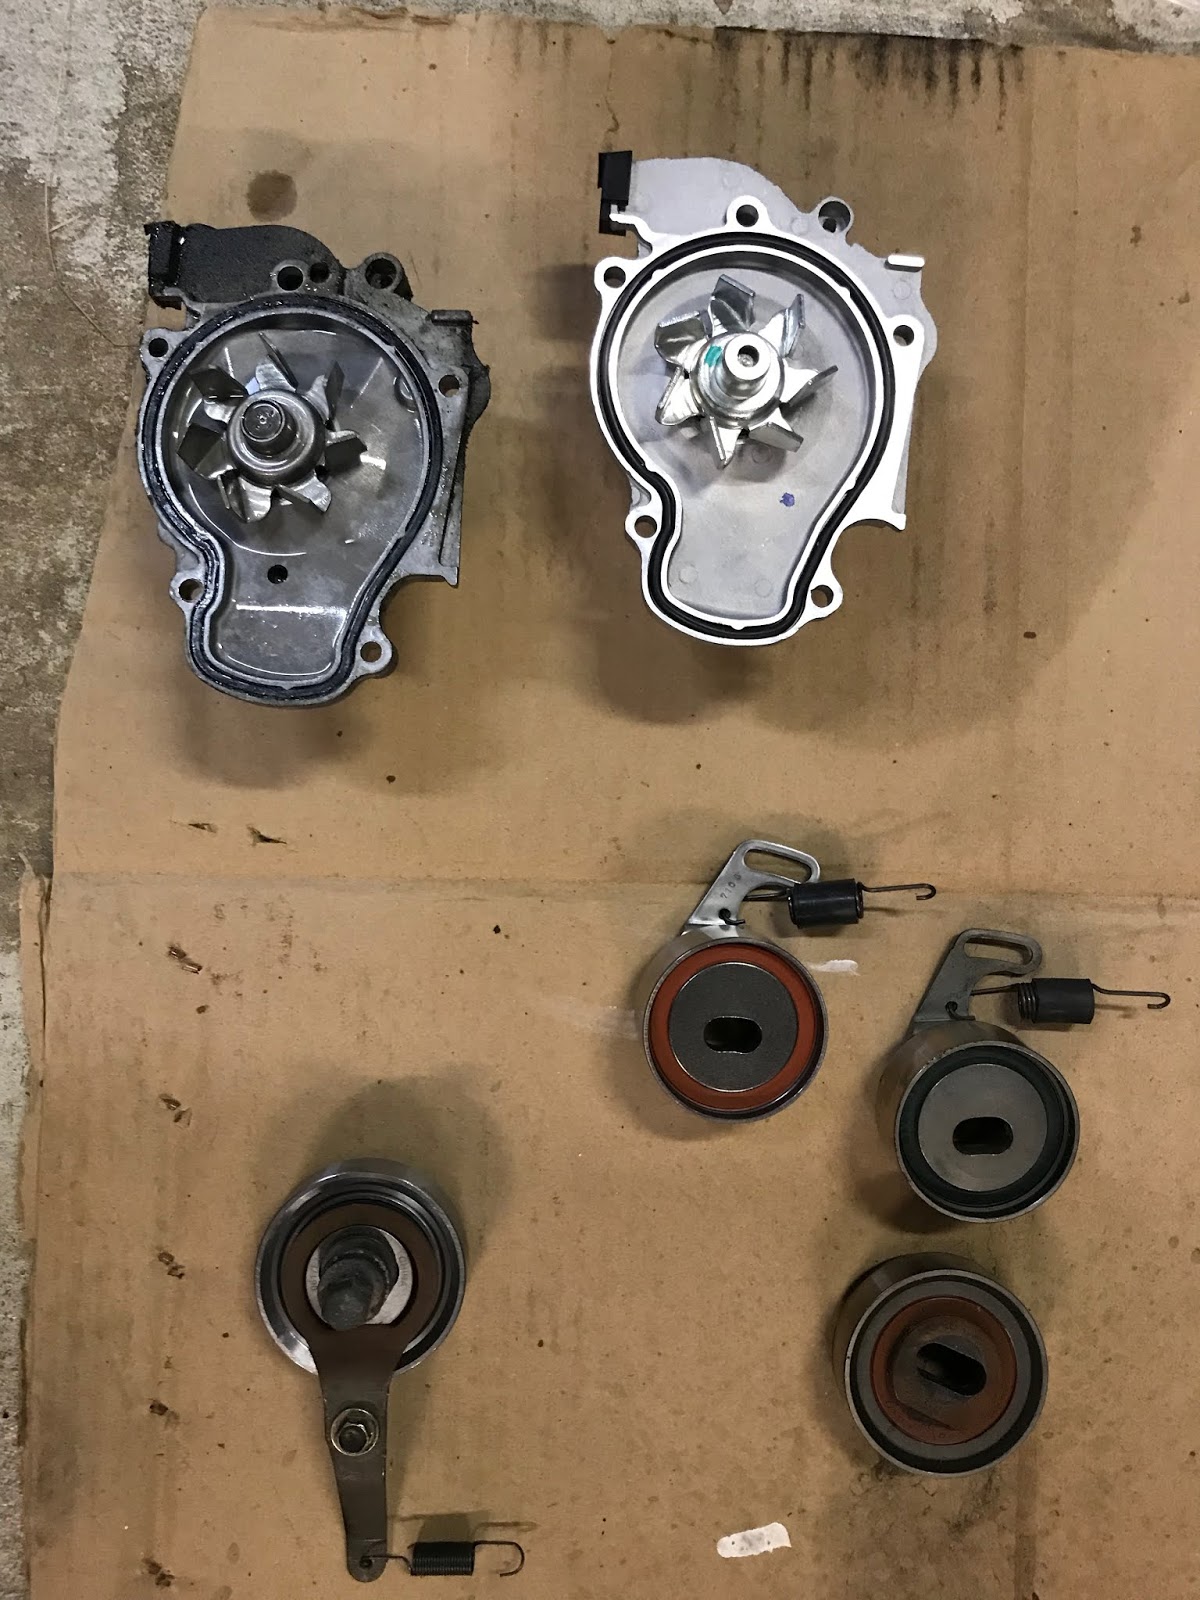
Gates brand, new timing and balancer belts, tensioner pulleys, water pump with gasket, and springs.


A happy moment when I finally got the crank pully bolt off. It laughed at my 25" breaker bar (w/ cheater pipe). The torque spec for this bolt is 180 ft. lbs., that's with the threads and mating surface (as per instructions) lubricated with oil. So after being tightened for like...10 years, I needed a torch (don't melt the rubber harmonic balancer) and my buddy's 1200 ft lbs. impact wrench to loosen it.


The halfway point. everything old is removed, and now to reassemble with new components. Tensioning the timing belt is critical. Too tight and it makes a whirring noise, too loose and it could skip


Old and new water pump and tensioners.


The lower timing belt cover gasket fell apart on disassembly (long exposure to heat and oil) so I had to go to the dealer and order a new one. This little 15" silicone rope is $30.
When there is no aftermarket, the dealer has got you by the balls.


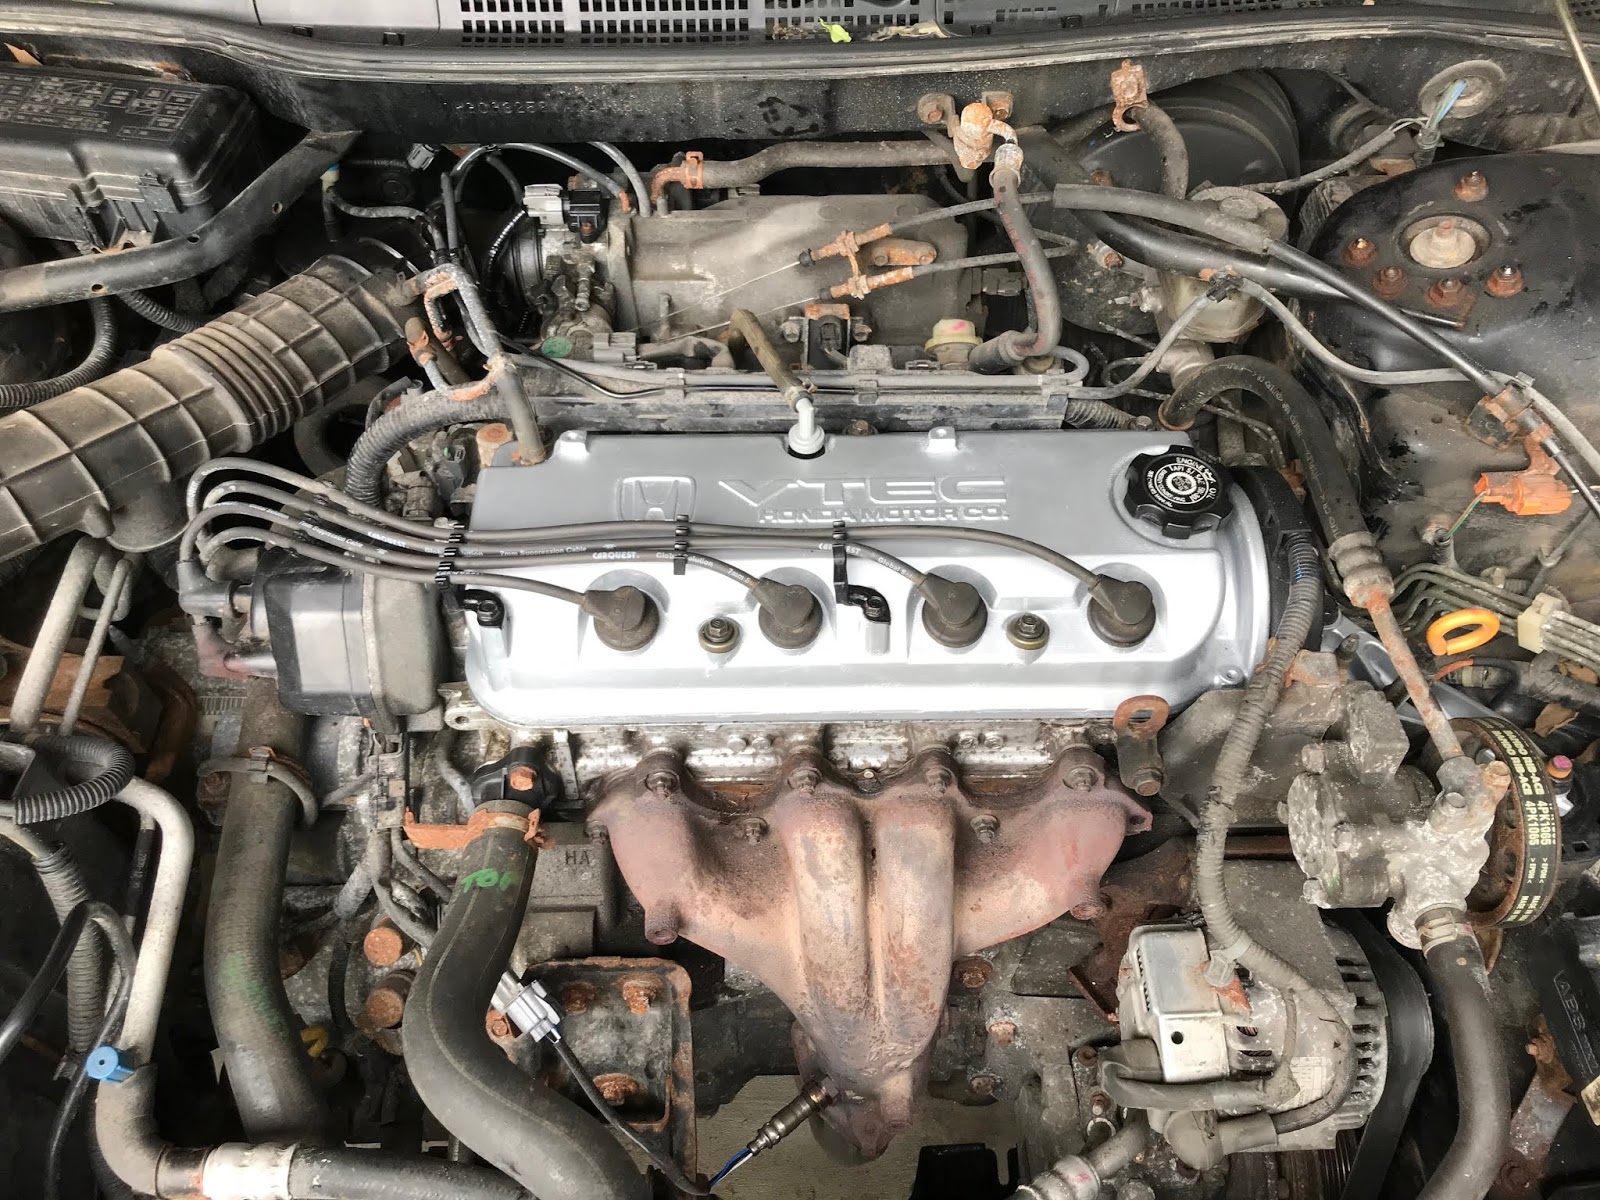
since the valve cover had to come off anyway I decided to restore it.


Old valve cover gasket was hard as a rock, and took a while to get off.
Now cleaned and ready to be stripped.


ready to be primed and painted.


Aluminum hi-temp paint and clear.


.....Still is a nasty looking engine bay.


Click here for update blog post on the beater: Gas tank, fuel line, and brake line replacement


I have had a check engine light (CEL) for a little while, meaning that I cannot pass emissions, and therefore I have expired tags on my car until I fix it, (if this was an OBD1 car, it wouldn't be a problem). the P1456 code indicates a large leak on the tank side of the emission control system. I can smell gas under the car, and see what looks like a rusted seam in the tank. I'm going to replace the tank and see if my CEL goes away. If not, there may also be a stuck valve or bad solenoid in the vapor lines. I'll cross that bridge if I come to it.


New gas tank, straps, and gaskets.


Related Posts Plugin for WordPress, Blogger...