Remove and replace gas tank (for starters)
click here for my original post on this car
This all started with a "check engine" light.
The code was P1456. --large leak on tank side of evaporative system. Thinking it was something small, I started to investigate (yeah.. not small). A mentor of mine pointed out that he could smell gas under the car, and could see wetness on a tank seam. Yup... that could be the cause.
New tank on subframe almost ready for reinstall
2000 Honda Accord Coupe EX beater
Step-by-step for this job + extra things I had to do, as I came across road blocks:
- Disconnect electric connector to fuel pump
- Drop exhaust system
- Remove filler neck cover
- Disconnect rubber filler and vent hoses, connected to filler neck
- Disconnect vapor lines by charcoal canister
- Disconnect plastic "quick connect" fittings to steel supply and return, fuel lines (not gonna happen. So....Cut nylon lines at fitting, and replace with 1 new "quick connect" fitting. Second fitting replace...fail, had to buy OE replacement return nylon section.)
- Disconnect electrical connectors for rear wheel speed sensors
- Remove heat shield on underside of rear subframe
- Disconnect parking brake cables from caliper and support brackets
- Disconnect rear brake hose from support brackets
- Disconnect rear calipers from knuckle, hang them on spring
- Disconnect bottom of struts from knuckle (not gonna happen, seized bolt on drivers side. So....drop subframe with strut attached. Cut though connecting bolt on both sides of bushing, with hacksaw, and muscle it out, ...took forever)
- Remove 4 subframe bolts
- Drop subframe using floor jack
- Unscrew flange to remove in-tank fuel pump (not gonna happen. So....drill out ALL hardware for fuel pump and vapor recovery system)
- Syphon out all fuel from tank..........At this point, I am free to make sparks, and use a torch, if need be.
- Disconnect 2 metal straps holding tank to subframe (not gonna happen. So....cut through straps with hacksaw, and sawzall through 2 rusted bolts and replace)
- Remove remains of metal straps, and replace with new ones
- Remove and replace tank
- Install new fuel pump and existing vapor recovery unit in new tank. (see picture #1)
- Install subframe and reattach basically in reverse of steps above.
Decided to expand job to include the following:
- Replace fuel filler neck
- Replace fuel pump (since I was in there)
- Replace rear struts and springs (after bolt fiasco)
- Replace all steel fuel lines that run from engine to the nylon lines
- Replace 2 steel brake lines going from proportioning valve to rear brake hoses.
- Make all new metal supports for lines, and add new plastic clips (old ones are long gone).
Cost of parts for this job:
- Tank $165
- Filler neck $37
- Fuel pump $99
- Rear struts, loaded $81
- new OE shock bolt $4
- Steel pre-bent fuel lines $179
- "Quick connect" fittings $10
- Valex Racing braided stainless brake lines $135
- Plastic line holder clips $33
- OE nylon return fuel line section $64
- Miscellaneous $50?
Total $857
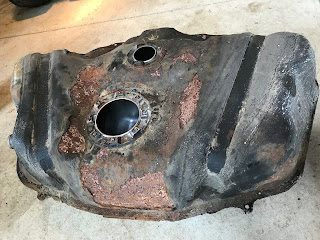
Top of old tank
New tank installed on rear subframe
A side note:
The underside of this car is so rusty, that 50% of all fasteners or bolts that need to be turned for disassembly, snap or crumble, and need to be drilled out. Odds are that the existing threads will not be saved when doing so. Thus, this car has given me the opportunity to try my hand at "tap and die" work. Not easy, as the spots can be upside-down, in hard to reach places. (no luxury of a drill press here.)
Interesting point...if you gain some experience tapping threads, you are more likely to be able to save rusted hardware, because if you can budge a rusted nut or bolt, you can possibly save it, by turning it with the same back and forth cutting motion, used when tapping threads.
I had to cut the old "quick connect" fittings apart with a hacksaw and pry them off. Because this little bit of rust underneath, rendered them impossible to separate.
This high pressure fuel line fitting on the firewall
took a boat-load of torque to crack loose after 20 years.
Fuel and brake lines
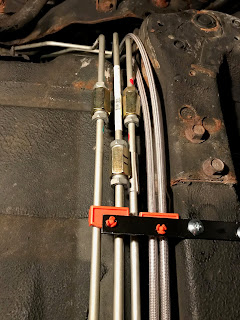
My fuel and brake lines were in raggedy condition. Since I had to almost ruin them, to separate the metal and nylon, and they looked to be on their last legs anyway, I decided to go ahead and replace them all, as this would be the time. I drilled and tapped holes for my new homemade supports, and added some modified, orange, Ebay plastic line clips.
fuel and brake lines by firewall, before...
...after
middle, before...
...after
at rear axle area, before...
...after
I had to drill out all the old hardware holding the fuel pump, so that I could restore and reuse the metal flange that holds the pump against the gasket. (that was the only part that was staying) the Honda dealer wanted $42 for that simple metal part, so I decided to rescue it.
Retrieving fuel pump flange to restore and reuse.
Bottom of filler neck looked pretty sketchy, so... since it's cheap,...remove and replace.
Old and new fuel pump.
New lines seen from below.
New tank installed seen from below
Mission Accomplished:
This was a job that I was almost ready to bail on, when I first realized what needed to be done. I'm glad I went forward. This job was all done on jack stands, without a lift. It was mostly labor, and the replacement parts for this car are cheap, and plentiful (mostly). I learned a lot from this exercise in "remove and replace" and I feel that my competence has gone up a notch.
My guess is, If all this work was done by a professional shop, the bill would come to about $4,000-5,000 - parts and labor (not even using OE). Seems like a bargain, that I did it for $850.
The check engine light never came back. I passed emissions, and have current tags on the car. Even if this had NOT been the cause of the code, it needed to be done, or else the car junked. A gas tank leaking because of a rusty seam will be undrivable after a while, if left untreated.


